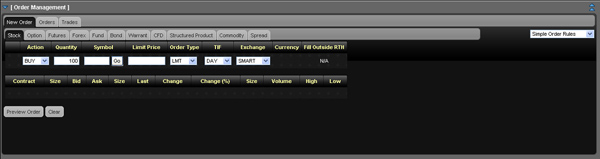
You can create an order on any WebTrader page using the
Order Management panel. In addition, you can add order attributes of Trailing
Stop, Discretionary and Bracket to expand the order types.
You can also create an order on the Market, Option, Scanner
or any Product page you create by clicking the Bid or Ask price of an instrument.
To create an order on any WebTrader page
Click the blue arrow or the title
[Order Management] in the Order Management Panel title bar.
The Order Management Panel expands to fill the
bottom half of the screen.
In the Order Management panel, click
the New Order tab.
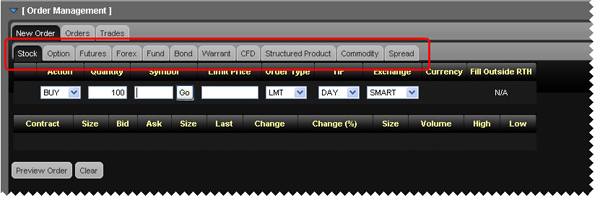
On the New Order tab, select an asset
type by clicking the appropriate tab (Stock, Option, Futures, etc).
In the Symbol field, enter a symbol,
then click the Go button,
press the Tab or press the
Enter key.
A list of available instruments appears in a drop-down list.
Click the instrument for which you want
to place an order.
Enter the rest of the order parameters
in the fields provided, including:
Action - Buy or Sell.
Quantity - number of units
in the order.
Limit Price - for Limit and
Stop Limit orders.
Stop Price - for Stop and Stop
Limit orders, the price that must be penetrated to initiate the order.
Order Type - Limit, Market,
Stop, Stop Limit, Limit-on-Close, Market-on-Close, Trailing Stop,
or Trailing Stop Limit.
TIF - Day, GTC, IOC or OPG.
A Day order continues to work until it executes or the market closes.
GTC (good 'til cancelled) order continues to work until it executes
or is cancelled. An IOC (Immediate-or-Cancel) order instructs the
system to cancel any portion of the order that is not filled immediately.
An OPG time in force is used with a Limit order to indicate a Limit-on-Open
order, or with a Market order to indicate a Market-on-Open order.
If you have enabled Advanced
Time In Force Attributes on the Preferences page or
by selecting Advanced Time in Force
from the drop-down in the upper right corner of the New Order
tab, the Start Time and End Time fields are added to the order fieldsand
you can select GAT for a Good-after-Time/Date order, or GTD for a
Good-til-Date order. Be sure to select your time zone in the Advanced
Time in Force section of the Preferences page or the default time
zone for the Start Time and End Time field will be GMT.
Fill Outside RTH - Selecting
this check box allows the order to fill or trigger outside of regular
house (as well as during regular trading hourse) if the order is eligible
to do so.
Exchange - select SMART to
get the best execution, or choose to direct-route to a single exchange
by choosing from the list.
You can delete the order before
you submit or preview it by clicking the Clear button.
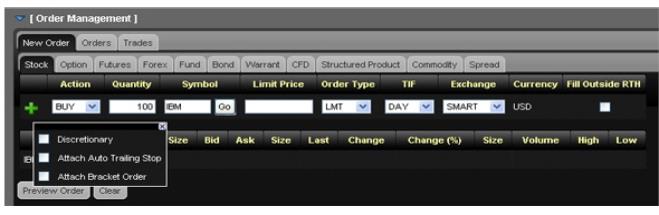
You can add attributes to your order
once you enter a symbol by clicking the green plus sign (+) located
on the left side of the order fields, then selecting the appropriate
check box in the popup window. Be sure to click the X
button to close the popup window.
Discretionary -
Selecting this check box adds the Discr Amt field to the order parameters.
Enter the discretionary amount in this field.
Attach
Auto Trailing Stop - Selecting this check box adds a trailing
stop order to displayed order. You can modify the Action, Limit Price,
TIF or Exchange for the trailing stop order.
Attach
Bracket Order - Adds two orders to your original orders
to form a bracket order, and adds the Election Price field to the
third order in the bracket. You can modify the Action, Limit Price,
TIF or Exchange for the second and third order in the bracket, and
the Election Price for the third order.
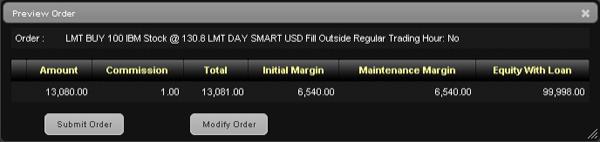
Click Preview
Order. The order preview shows the amount of the trade, the
commission, and what your total initial and maintenance margin and
total Equity with Loan Value will be if the trade is executed.
Click Modify
Order to further modify the order, or Submit
Order to transmit the order.
If you have Expert Mode turned on (enabled on
the Preferences page), you can submit the order without previewing it.